11. 디지털 주사위 :: 가속도계, 자이로스코프, Sensor_plus
11.1 사전 지식
11.1.1 가속도계

- 특정 물체가 특정 방향으로 이동하는 가속도가 어느 정도인지를 숫자로 측정하는 기기
- 3개의 축 -> x(좌우), y(위아래), z(앞뒤) 축
- 측정 결과가 모두 double로 변환되어 출력
11.1.2 자이로스코프
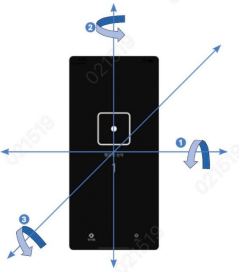
- x, y, z 축의 회전을 측정할 수 있음.
- 3개의 축 -> x(좌우), y(위아래), z(앞뒤) 축
11.1.3 Sensor_Plus 패키지
- 가속도계 & 자이로스코프 패키지를 사용할 수 있게 해줌.
// 중력을 반영한 가속도계 값
accelerometerEvents.listen((AccelerometerEvent event) {
	print(event.x); // x= 수치
	print(event.y); // y= 수치
	print(event.z); // z= 수치
});

// 중력을 반영하지 않은 순수 사용자의 힘의 의한 가속도계 값
userAccelerometerEvents.listen((UserAccelerometerEvent event) {
	print(event.x); // x축 수치
	print(event.y); // y축 수치
	print(event.z); // z축 수치
});

gyroscopeEvents.listen((GyroscopeEvent event) {
	print(event.x); // x축 수치
	print(event.y); // y축 수치
	print(event.z); // z축 수치
});
11.2 사전 준비
- 1. 상수 추가하기
- 2. 이미지 추가하기
- asset > img 폴더 생성, 파일 DnD
- 3. pubspec.yaml 설정하기
- 이미지 읽을 위치를 pubspec.yaml에 추가하기
- 4. 프로젝트 초기화하기
- lib > screen 폴더 생성, HomeScreen.dart를 생성
- 5. Theme 설정하기
11.3 레이아웃 구성하기
- 1. 기본 스크린 위젯 (최상위 위젯)
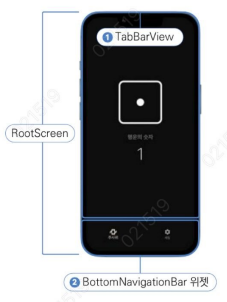
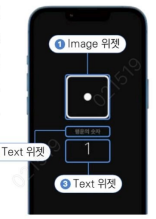
- 2. 홈 스크린 위젯
- 3. 설정 스크린 위젯
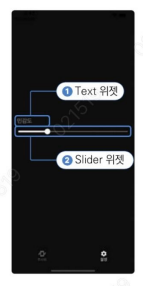
11.4 구현하기
- main.dart
import 'package:flutter/material.dart';
import 'package:random_dice/screen/home_screen.dart';
import 'package:random_dice/const/colors.dart';
import 'package:random_dice/screen/root_screen.dart';

void main() {
  runApp(
    MaterialApp(
      debugShowCheckedModeBanner: false,
      theme: ThemeData(
        scaffoldBackgroundColor: backgroundColor,
        sliderTheme: SliderThemeData(  // Slider 위젯 관련
          thumbColor: primaryColor,    // 동그라미 색
          activeTrackColor: primaryColor,  // 이동한 트랙 색

          // 아직 이동하지 않은 트랙 색
          inactiveTrackColor: primaryColor.withOpacity(0.3),         ),
        // BottomNavigationBar 위젯 관련
        bottomNavigationBarTheme: BottomNavigationBarThemeData(
          selectedItemColor: primaryColor,     // 선택 상태 색
          unselectedItemColor: secondaryColor, // 비선택 상태 색
          backgroundColor: backgroundColor,    // 배경 색
        ),
      ),
      home: RootScreen(),
    ),
  );
}
- home_screen.dart
import 'package:random_dice/const/colors.dart';
import 'package:flutter/material.dart';

class HomeScreen extends StatelessWidget {
  final int number;

  const HomeScreen({
    required this.number,
    Key? key,
  }) : super(key: key);

  @override
  Widget build(BuildContext context) {
    return Column(
      mainAxisAlignment: MainAxisAlignment.center,
      children: [

        // ➊ 주사위 이미지
        Center(
          child: Image.asset('asset/img/$number.png'),
        ),
        SizedBox(height: 32.0),
        Text(
          '행운의 숫자',
          style: TextStyle(
            color: secondaryColor,
            fontSize: 20.0,
            fontWeight: FontWeight.w700,
          ),
        ),
        SizedBox(height: 12.0),
        Text(
          number.toString(),  // ➋ 주사위 값에 해당되는 숫자
          style: TextStyle(
            color: primaryColor,
            fontSize: 60.0,
            fontWeight: FontWeight.w200,
          ),
        ),
      ],
    );
  }
}
- root_screen.dart
import 'package:flutter/material.dart';
import 'package:random_dice/screen/home_screen.dart';
import 'package:random_dice/screen/settings_screen.dart';
import 'dart:math';
import 'package:shake/shake.dart';

class RootScreen extends StatefulWidget {
  const RootScreen({Key? key}) : super(key: key);

  @override
  State<RootScreen> createState() => _RootScreenState();
}

class _RootScreenState extends State<RootScreen> with TickerProviderStateMixin{    // ➊
  TabController? controller;  // 사용할 TabController 선언
  double threshold = 2.7;
  int number = 1;
  ShakeDetector? shakeDetector;

  @override
  void initState() {
    super.initState();

    controller = TabController(length: 2, vsync: this);  // ➋

    controller!.addListener(tabListener);
    shakeDetector = ShakeDetector.autoStart(   // ➊ 흔들기 감지 즉시 시작
      shakeSlopTimeMS: 100,  // ➋ 감지 주기
      shakeThresholdGravity: threshold,  // ➌ 감지 민감도
      onPhoneShake: onPhoneShake,  // ➍ 감지 후 실행할 함수
    );
  }

  void onPhoneShake() {  // ➎ 감지 후 실행할 함수
    final rand = new Random();

    setState(() {
      number = rand.nextInt(5) + 1;
    });
  }

  tabListener() {  // ➋ listener로 사용할 함수
    setState(() {});
  }

  @override
  dispose(){
    controller!.removeListener(tabListener); // ➌ listener에 등록한 함수 등록 취소
    shakeDetector!.stopListening();
    super.dispose();
  }

  @override
  Widget build(BuildContext context) {
    return Scaffold(
      body: TabBarView(  // ➊ 탭 화면을 보여줄 위젯
        controller: controller,
        children: renderChildren(),
      ),

      // ➋ 아래 탭 네비게이션을 구현하는 매개변수
      bottomNavigationBar: renderBottomNavigation(),
    );
  }

  List<Widget> renderChildren(){
    return [
      HomeScreen(number: number),
      SettingsScreen(  // 기존에 있던 Container 코드를 통째로 교체
        threshold: threshold,
        onThresholdChange: onThresholdChange,
      ),
    ];
  }

  void onThresholdChange(double val){  // ➊ 슬라이더값 변경 시 실행 함수
    setState(() {
      threshold = val;
    });
  }

  BottomNavigationBar renderBottomNavigation() {
    return BottomNavigationBar(
      currentIndex: controller!.index,
      onTap: (int index) {  // ➎ 탭이 선택될 때마다 실행되는 함수
        setState(() {
          controller!.animateTo(index);
        });
      },
      items: [
        BottomNavigationBarItem(  // ➊ 하단 탭바의 각 버튼을 구현
          icon: Icon(
            Icons.edgesensor_high_outlined,
          ),
          label: '주사위',
        ),
        BottomNavigationBarItem(
          icon: Icon(
            Icons.settings,
          ),
          label: '설정',
        ),
      ],
    );
  }
}
- settings_screen.dart
import 'package:random_dice/const/colors.dart';
import 'package:flutter/material.dart';

class SettingsScreen extends StatelessWidget {
  final double threshold;  // Slider의 현잿값

  // Slider가 변경될 때마다 실행되는 함수
  final ValueChanged<double> onThresholdChange;

  const SettingsScreen({
    Key? key,

    // threshold와 onThresholdChange는 SettingsScreen에서 입력
    required this.threshold,
    required this.onThresholdChange,
  }) : super(key: key);

  @override
  Widget build(BuildContext context) {
    return Column(
      mainAxisAlignment: MainAxisAlignment.center,
      children: [
        Padding(
          padding: const EdgeInsets.only(left: 20.0),
          child: Row(
            children: [
              Text(
                '민감도',
                style: TextStyle(
                  color: secondaryColor,
                  fontSize: 20.0,
                  fontWeight: FontWeight.w700,
                ),
              ),
            ],
          ),
        ),
        Slider(
          min: 0.1,  // 최솟값
          max: 10.0,  // 최댓값
          divisions: 101,  // 최솟값과 최댓값 사이 구간 개수
          value: threshold,  // 슬라이더 선택값
          onChanged: onThresholdChange,  // 값 변경 시 실행되는 함수
          label: threshold.toStringAsFixed(1),  // 표싯값
        ),
      ],
    );
  }
}
- colors.dart
import 'package:flutter/material.dart';
const backgroundColor = Color(0xFF0E0E0E);  // 배경색
const primaryColor = Colors.white;  // 주 색상
final secondaryColor = Colors.grey[600];  // 보조 색상
12. 동영상 플레이어:: 화면 회전, 시간 변환, String 패딩
12.1 사전 지식
12.1.3 시간 변환 및 String 패딩
- Duration 클래스
- '.' 을 기준으로 String을 split( )해서 밀리초 단위 삭제 => ':' 를 기준으로 split( )해서 시, 분, 초 단위로 나뉜 List 값을 반환
Duration duration = Duration(seconds: 192);
print(duration);
print('${duration.inMinutes.toString().padLeft(2, ‘0')}:${(duration.inSeconds%60).toString().padLeft(2, 'Q')}');
11.2.4 네이티브 설정하기(Android 권한 추가)
- AndroidManifest.xml에 저장소 읽기 권한 명시
<manifest xmlns:android="http://schemas.android.com/apk/res/android">
	<uses-permission android:name="android.permission.READ_EXTERNAL_STORAGE" />
	<application
		android: name="${applicationName}"
		android: icon="@mipmap/ic_launcher"
		android: label="book_ch11_test">
		<!-- 생략 -->
	</application>
</manifest>
12.2.5 프로젝트 초기화하기
- HomeScreen 생성
import 'package: flutter/material.dart';
	class HomeScreen extends StatelessWidget {
	const HomeScreen({Key? key}) : super(key: key);
	@override
	Widget build(BuildContext context) {
		return Scaffold(
			body: Text('Home Screen'),
		);
	}
}
import 'package:vid_player/screen/home_screen.dart';
import 'package: flutter/material.dart';
void main() {
runApp(
MaterialApp(
home: HomeScreen(),
),
);
}12.3 레이아웃 구성하기
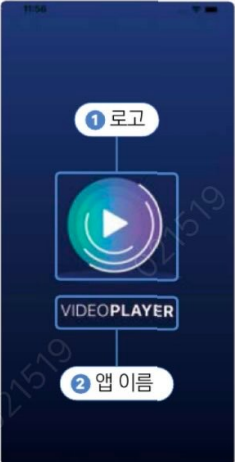
- 1. 첫 화면 : renderEmpty() 함수
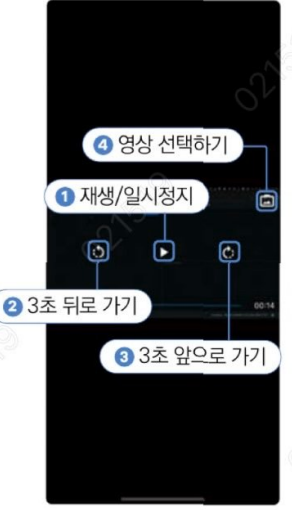
- 2. 플레이 화면 : renderVideo() 함수
12.4 동영상 선택 및 재생
12.4.1 첫 화면 : renderEmpty( ) 함수 구현하기
import 'package: flutter/material.dart' ;
import 'package: image_picker/image_picker.dart';
class HomeScreen extends StatefulWidget {
	const HomeScreen({Key? key}) : super(key: key);
	@override
	State<HomeScreen> createState() => _HomeScreenState();
}
class _HomeScreenState extends State<HomeScreen> {
	XFile? video;
	@override
	Widget build(BuildContext context) {
		return Scaffold(
			backgroundColor: Colors.black,
			body: video == null ? renderEmpty() : renderVideo(),
		);
    }
    Widget renderEmpty(){
		return Container();
	}
	Widget renderVideo(){
		return Container();
	}
}
class _AppName extends StatelessWidget {
const _AppName({Key? key}) : super(key: key);
@override
Widget build(BuildContext context) {
final textStyle = TextStyle(
color: Colors.white,
fontSize: 30.0,
fontWeight: FontWeight.w300,
);
return Row(
mainAxisAlignment: MainAxisAlignment.center,
children: [
Text(
'VIDEO',
style: textStyle,
),
Text(
'PLAYER',
style: textStyle.copyWith(
fontWeight: FontWeight.w700,
),
),
],
);
}
}12.4.2 배경색 그라데이션 구현하기
BoxDecoration getBoxDecoration() {
	return BoxDecoration(
		gradient: LinearGradient(
			begin: Alignment. topCenter,
			end: Alignment.bottomCenter,
			colors: [
				Color (@xFF2A3A7C),
				Color (@xFF@00118),
            ],
        ),
    );
}import 'package:vid_player/screen/home_screen.dart';
import 'package:flutter/material.dart';
void main() {
runApp(
MaterialApp(
debugShowCheckedModeBanner: false,
home: HomeScreen(),
),
);
}import 'package:flutter/material.dart';
import 'package:image_picker/image_picker.dart';
import 'package:vid_player/component/custom_video_player.dart';
class HomeScreen extends StatefulWidget {
const HomeScreen({Key? key}) : super(key: key);
@override
State<HomeScreen> createState() => _HomeScreenState();
}
class _HomeScreenState extends State<HomeScreen> {
XFile? video;
@override
Widget build(BuildContext context) {
return Scaffold(
backgroundColor: Colors.black,
// ➋ 동영상이 선택됐을 때와 선택 안 됐을때 보여줄 위젯
body: video == null ? renderEmpty() : renderVideo(),
);
}
Widget renderEmpty(){ // ➌ 동영상 선택 전 보여줄 위젯
return Container(
width: MediaQuery.of(context).size.width, // 넓이 최대로 늘려주기
decoration: getBoxDecoration(),
child: Column(
// 위젯들 가운데 정렬
mainAxisAlignment: MainAxisAlignment.center,
children: [
_Logo(
onTap: onNewVideoPressed,
), // 로고 이미지
SizedBox(height: 30.0),
_AppName(), // 앱 이름
],
),
);
}
void onNewVideoPressed() async { // ➋ 이미지 선택하는 기능을 구현한 함수
final video = await ImagePicker().pickVideo(
source: ImageSource.gallery,
);
if (video != null) {
setState(() {
this.video = video;
});
}
}
BoxDecoration getBoxDecoration() {
return BoxDecoration(
gradient: LinearGradient( // ➋ 그라데이션으로 색상 적용하기
begin: Alignment.topCenter,
end: Alignment.bottomCenter,
colors: [
Color(0xFF2A3A7C),
Color(0xFF000118),
],
),
);
}
Widget renderVideo(){
return Center(
child: CustomVideoPlayer(
video: video!, // ➋ 선택된 동영상 입력해주기
onNewVideoPressed: onNewVideoPressed,
),
);
}
}
class _Logo extends StatelessWidget { // 로고를 보여줄 위젯
final GestureTapCallback onTap;
const _Logo({
required this.onTap,
Key? key,
}) : super(key: key);
@override
Widget build(BuildContext context) {
return GestureDetector(
onTap: onTap, // ➌ 상위 위젯으로부터 탭 콜백받기
child: Image.asset(
'asset/img/logo.png',
),
);
}
}
class _AppName extends StatelessWidget { // 앱 제목을 보여줄 위젯
const _AppName({Key? key}) : super(key: key);
@override
Widget build(BuildContext context) {
final textStyle = TextStyle(
color: Colors.white,
fontSize: 30.0,
fontWeight: FontWeight.w300,
);
return Row(
mainAxisAlignment: MainAxisAlignment.center, // 글자 가운데 정렬
children: [
Text(
'VIDEO',
style: textStyle,
),
Text(
'PLAYER',
style: textStyle.copyWith(
// ➊ textStyle에서 두께만 700으로 변경
fontWeight: FontWeight.w700,
),
),
],
);
}
}- custom_icon_button.dart
import 'package:flutter/material.dart';
class CustomIconButton extends StatelessWidget {
final GestureTapCallback onPressed; // ➊ 아이콘을 눌렀을 때 실행할 함수
final IconData iconData; // ➋ 아이콘
const CustomIconButton({
required this.onPressed,
required this.iconData,
Key? key,
}) : super(key: key);
@override
Widget build(BuildContext context) {
return IconButton( // 아이콘을 버튼으로 만들어주는 위젯
onPressed: onPressed, // 아이콘을 눌렀을 때 실행할 함수
iconSize: 30.0, // 아이콘 크기
color: Colors.white, // 아이콘 색상
icon: Icon( // 아이콘
iconData,
),
);
}
}
import 'package:flutter/material.dart';
import 'package:image_picker/image_picker.dart';
import 'package:vid_player/component/custom_video_player.dart';

class HomeScreen extends StatefulWidget {
  const HomeScreen({Key? key}) : super(key: key);

  @override
  State<HomeScreen> createState() => _HomeScreenState();
}

class _HomeScreenState extends State<HomeScreen> {
  XFile? video;

  @override
  Widget build(BuildContext context) {
    return Scaffold(
      backgroundColor: Colors.black,

      // ➋ 동영상이 선택됐을 때와 선택 안 됐을때 보여줄 위젯
      body: video == null ? renderEmpty() : renderVideo(),
    );
  }

  Widget renderEmpty(){  // ➌ 동영상 선택 전 보여줄 위젯
    return Container(
      width: MediaQuery.of(context).size.width, // 넓이 최대로 늘려주기
      decoration: getBoxDecoration(),
      child: Column(

        // 위젯들 가운데 정렬
        mainAxisAlignment: MainAxisAlignment.center,
        children: [
          _Logo(
            onTap: onNewVideoPressed,
          ),  // 로고 이미지
          SizedBox(height: 30.0),
          _AppName(),  // 앱 이름
        ],
      ),
    );
  }

  void onNewVideoPressed() async {  // ➋ 이미지 선택하는 기능을 구현한 함수
    final video = await ImagePicker().pickVideo(
      source: ImageSource.gallery,
    );

    if (video != null) {
      setState(() {
        this.video = video;
      });
    }
  }

  BoxDecoration getBoxDecoration() {
    return BoxDecoration(
      gradient: LinearGradient(  // ➋ 그라데이션으로 색상 적용하기
        begin: Alignment.topCenter,
        end: Alignment.bottomCenter,
        colors: [
          Color(0xFF2A3A7C),
          Color(0xFF000118),
        ],
      ),
    );
  }

  Widget renderVideo(){
    return Center(
      child: CustomVideoPlayer(
        video: video!, // ➋ 선택된 동영상 입력해주기
        onNewVideoPressed: onNewVideoPressed,
      ),
    );
  }
}

class _Logo extends StatelessWidget { // 로고를 보여줄 위젯
  final GestureTapCallback onTap;

  const _Logo({
    required this.onTap,
    Key? key,
  }) : super(key: key);

  @override
  Widget build(BuildContext context) {
    return GestureDetector(
      onTap: onTap,  // ➌ 상위 위젯으로부터 탭 콜백받기
      child: Image.asset(
        'asset/img/logo.png',
      ),
    );
  }
}

class _AppName extends StatelessWidget { // 앱 제목을 보여줄 위젯
  const _AppName({Key? key}) : super(key: key);

  @override
  Widget build(BuildContext context) {
    final textStyle = TextStyle(
      color: Colors.white,
      fontSize: 30.0,
      fontWeight: FontWeight.w300,
    );

    return Row(
      mainAxisAlignment: MainAxisAlignment.center,  // 글자 가운데 정렬
      children: [
        Text(
          'VIDEO',
          style: textStyle,
        ),
        Text(
          'PLAYER',
          style: textStyle.copyWith(

            // ➊ textStyle에서 두께만 700으로 변경
            fontWeight: FontWeight.w700,
          ),
        ),
      ],
    );
  }
}```dart
import 'package:flutter/material.dart';

class CustomIconButton extends StatelessWidget {
  final GestureTapCallback onPressed;  // ➊ 아이콘을 눌렀을 때 실행할 함수
  final IconData iconData;  // ➋ 아이콘

  const CustomIconButton({
    required this.onPressed,
    required this.iconData,
    Key? key,
  }) : super(key: key);

  @override
  Widget build(BuildContext context) {
    return IconButton(  // 아이콘을 버튼으로 만들어주는 위젯
      onPressed: onPressed,  // 아이콘을 눌렀을 때 실행할 함수
      iconSize: 30.0,   // 아이콘 크기
      color: Colors.white,   // 아이콘 색상
      icon: Icon(       // 아이콘
        iconData,
      ),
    );
  }
}
```
- custom_video_player.dart
```dart
import 'package:flutter/material.dart';
import 'package:image_picker/image_picker.dart';
import 'package:video_player/video_player.dart';
import 'dart:io';
import 'package:vid_player/component/custom_icon_button.dart';
// ➊ 동영상 위젯 생성
class CustomVideoPlayer extends StatefulWidget {
// 선택한 동영상을 저장할 변수
final XFile video;
final GestureTapCallback onNewVideoPressed;
const CustomVideoPlayer({
required this.video, // 상위에서 선택한 동영상 주입해주기
required this.onNewVideoPressed,
Key? key,
}) : super(key: key);
@override
State<CustomVideoPlayer> createState() => _CustomVideoPlayerState();
}
class _CustomVideoPlayerState extends State<CustomVideoPlayer> {
VideoPlayerController? videoController;
bool showControls = false;
@override
// covariant 키워드는 CustomVideoPlayer 클래스의 상속된 값도 허가해줍니다.
void didUpdateWidget(covariant CustomVideoPlayer oldWidget) {
super.didUpdateWidget(oldWidget);
// ➊ 새로 선택한 동영상이 같은 동영상인지 확인
if (oldWidget.video.path != widget.video.path) {
initializeController();
}
}
@override
void initState() {
super.initState();
initializeController(); // ➋ 컨트롤러 초기화
}
initializeController() async {
// ➌ 선택한 동영상으로 컨트롤러 초기화
final videoController = VideoPlayerController.file(
File(widget.video.path),
);
await videoController.initialize();
videoController.addListener(videoControllerListener);
setState(() {
this.videoController = videoController;
});
}
void videoControllerListener() {
setState(() {});
}
@override
void dispose() {
// ➋ listener 삭제
videoController?.removeListener(videoControllerListener);
super.dispose();
}
@override
Widget build(BuildContext context) {
if (videoController == null) {
return Center(
child: CircularProgressIndicator(),
);
}
return GestureDetector(
// ➋ 화면 전체의 탭을 인식하기 위해 사용
onTap: () {
setState(() {
showControls = !showControls;
});
},
child: AspectRatio(
aspectRatio: videoController!.value.aspectRatio,
child: Stack(
// ➊ children 위젯을 위로 쌓을 수 있는 위젯
children: [
VideoPlayer(
// VideoPlayer 위젯을 Stack으로 이동
videoController!,
),
if(showControls)
Container( // ➌ 아이콘 버튼을 보일 때 화면을 어둡게 변경
color: Colors.black.withOpacity(0.5),
),
Positioned(
bottom: 0,
left: 0,
right: 0,
child: Padding(
padding: EdgeInsets.symmetric(horizontal: 8.0),
child: Row(
children: [
renderTimeTextFromDuration(
// 동영상 현재 위치
videoController!.value.position,
),
Expanded(
// Slider가 남는 공간을 모두 차지하도록 구현
child: Slider(
onChanged: (double val) {
videoController!.seekTo(
Duration(seconds: val.toInt()),
);
},
value: videoController!.value.position.inSeconds
.toDouble(),
min: 0,
max: videoController!.value.duration.inSeconds
.toDouble(),
),
),
renderTimeTextFromDuration(
// 동영상 총 길이
videoController!.value.duration,
),
],
),
),
),
if(showControls)
Align(
// ➊ 오른쪽 위에 새 동영상 아이콘 위치
alignment: Alignment.topRight,
child: CustomIconButton(
onPressed: widget.onNewVideoPressed,
iconData: Icons.photo_camera_back,
),
),
if (showControls)
Align(
// ➋ 동영상 재생관련 아이콘 중앙에 위치
alignment: Alignment.center,
child: Row(
mainAxisAlignment: MainAxisAlignment.spaceEvenly,
children: [
CustomIconButton(
// 되감기 버튼
onPressed: onReversePressed,
iconData: Icons.rotate_left,
),
CustomIconButton(
// 재생 버튼
onPressed: onPlayPressed,
iconData: videoController!.value.isPlaying
? Icons.pause
: Icons.play_arrow,
),
CustomIconButton(
// 앞으로 감기 버튼
onPressed: onForwardPressed,
iconData: Icons.rotate_right,
),
],
),
),
],
),
),
);
}
Widget renderTimeTextFromDuration(Duration duration) {
return Text(
'${duration.inMinutes.toString().padLeft(2, '0')}:${(duration.inSeconds % 60).toString().padLeft(2, '0')}',
style: TextStyle(
color: Colors.white,
),
);
}
void onReversePressed() {
// ➊ 되감기 버튼 눌렀을 때 실행할 함수
final currentPosition = videoController!.value.position; // 현재 실행 중인 위치
Duration position = Duration(); // 0초로 실행 위치 초기화
if (currentPosition.inSeconds > 3) {
// 현재 실행위치가 3초보다 길때만 3초 빼기
position = currentPosition - Duration(seconds: 3);
}
videoController!.seekTo(position);
}
void onForwardPressed() {
// ➋ 앞으로 감기 버튼 눌렀을 때 실행할 함수
final maxPosition = videoController!.value.duration; // 동영상 길이
final currentPosition = videoController!.value.position;
Duration position = maxPosition; // 동영상 길이로 실행 위치 초기화
// 동영상 길이에서 3초를 뺀 값보다 현재 위치가 짧을 때만 3초 더하기
if ((maxPosition - Duration(seconds: 3)).inSeconds >
currentPosition.inSeconds) {
position = currentPosition + Duration(seconds: 3);
}
videoController!.seekTo(position);
}
void onPlayPressed() {
// ➌ 재생 버튼을 눌렀을 때 실행할 함수
if (videoController!.value.isPlaying) {
videoController!.pause();
} else {
videoController!.play();
}
}
}
```13. 영상 통화 :: WebRTC, 내비게이션, 아고라 API
13.1 사전 지식
13.1.1 카메라 플러그인
- pubspec.yaml 에 camera 플러그인 추가
dependencies:
	flutter:
		sdk: flutter

cupertino_icons: ^1.0.8
camera: 0.10.5+5
- main.dart 작성
import 'package:camera/camera.dart';
import 'package:flutter/material.dart';

late List<CameraDescription> _cameras;

Future<void> main() async {
	// 1.Flutter 앱이 실행될 준비가 됐는지 확인
	WidgetsFlutterBinding.ensureInitialized();

	// 2.핸드폰에 있는 카메라들 가져오기
	_cameras = await availableCameras();
	runApp(const CameraApp());
}

class CameraApp extends StatefulWidget {
	const CameraApp({Key? key}) : super(key: key);
	@override
	State<CameraApp> createState() => _CameraAppState();
}

class _CameraAppState extends State<CameraApp> {

	// 3.카메라를 제어할 수 있는 컨트롤러 선언
	late CameraController controller;

	@override
	void initState() {
		super. initState();

		initializeCamera();
	}

	initializeCamera() async {
		try{

			// 4. 가장 첫 번째 카메라로 카메라 설정하기
			controller = CameraController(_cameras[0], ResolutionPreset.max);

			//5. 카메라 초기화
			await controller.initialize();
			setState(() {});
		} catch (e){

		// 에러났을 때 출력
		if(e is CamerException) {
			switch (e.code) {
				case 'CameraAccessDenied':
					print('User denied camera access.');
					break;
				default:
					print('Handle other errors.');
					break;
			}
		}
	}
}

@override
void dispose() {

	// 컨트롤러 삭제
	controller.dispose();
	super.dispose();
}

@override
Widget build(BuildContext context) {
// 6.카메라 초기화 상태 확인
if (!controller.value.isInitialized) {
	return Container();
}
return MaterialApp(

		// 카메라 보여주기
		home: CameraPreview(controller),
	);
 }
}
13.1.2 WebRTC
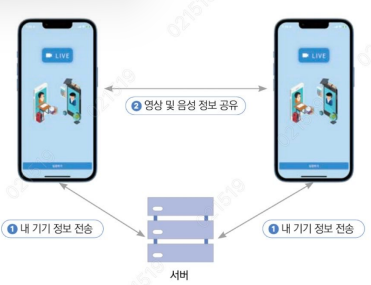
- 웹 브라우저 기반 통신, 음성/영상 통화 & P2P 파일 공유 기능을 제공하는 API
- 시그널링 서버(중계용 서버) -> 아고라 서비스 사용
13.1.4 내비게이션
- 내비게이션 스택의 작동 방식
- push(), pushReplacement(), pushAndRemoveUntil(), pop(), maybePop(), popUntil()

13.2 사전 준비
- 아고라에 가입 후 필요한 상수값 가져오기
13.3 레이아웃 구성하기
- 1. 홈 스크린 위젯
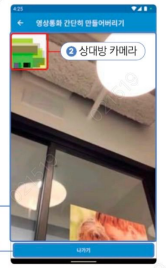
- 2. 캠 스크린 위젯
13.4 구현하기
- main.dart
import 'package:video_call/screen/home_screen.dart';
import 'package:flutter/material.dart';

void main() {
  runApp(
    MaterialApp(
      debugShowCheckedModeBanner: false,
      home: HomeScreen(),
    ),
  );
}
- cam_screen.dart
import 'package:agora_rtc_engine/agora_rtc_engine.dart';
import 'package:flutter/material.dart';
import 'package:permission_handler/permission_handler.dart';
import 'package:video_call/const/agora.dart';

class CamScreen extends StatefulWidget {
  const CamScreen({Key? key}) : super(key: key);

  @override
  _CamScreenState createState() => _CamScreenState();
}

class _CamScreenState extends State<CamScreen> {
  RtcEngine? engine; // 아고라 엔진을 저장할 변수
  int? uid; // 내 ID
  int? otherUid; // 상대방 ID

  Future<bool> init() async {
    // ➊ 권한 관련 작업 모두 실행
    final resp = await [Permission.camera, Permission.microphone].request();

    final cameraPermission = resp[Permission.camera];
    final micPermission = resp[Permission.microphone];

    if (cameraPermission != PermissionStatus.granted ||
        micPermission != PermissionStatus.granted) {
      throw '카메라 또는 마이크 권한이 없습니다.';
    }
    if (engine == null) {
      // ➊ 엔진이 정의되지 않았으면 새로 정의하기

      engine = createAgoraRtcEngine();

      // 아고라 엔진을 초기화합니다.
      await engine!.initialize(
        // 초기화할때 사용할 세팅을 제공합니다.
        RtcEngineContext(
          // 미리 저장해둔 APP ID를 입력합니다
          appId: APP_ID,
          // 라이브 동영상 송출에 최적화합니다.
          channelProfile: ChannelProfileType.channelProfileLiveBroadcasting,
        ),
      );

      engine!.registerEventHandler(
        // ➋ 아고라 엔진에서 받을 수 있는 이벤트 값들 등록
        RtcEngineEventHandler(
          onJoinChannelSuccess: (RtcConnection connection, int elapsed) {
            // ➌ 채널 접속에 성공했을 때 실행
            print('채널에 입장했습니다. uid : ${connection.localUid}');
            setState(() {
              this.uid = connection.localUid;
            });
          },
          onLeaveChannel: (RtcConnection connection, RtcStats stats) {
            // ➍ 채널을 퇴장했을 때 실행
            print('채널 퇴장');
            setState(() {
              uid = null;
            });
          },
          onUserJoined: (RtcConnection connection, int remoteUid, int elapsed) {
            // ➎ 다른 사용자가 접속했을 때 실행
            print('상대가 채널에 입장했습니다. uid : $remoteUid');
            setState(() {
              otherUid = remoteUid;
            });
          },
          onUserOffline: (RtcConnection connection, int remoteUid,
              UserOfflineReasonType reason) {
            // ➏ 다른 사용자가 채널을 나갔을 때 실행
            print('상대가 채널에서 나갔습니다. uid : $uid');
            setState(() {
              otherUid = null;
            });
          },
        ),
      );

      // 엔진으로 영상을 송출하겠다고 세팅합니다.
      await engine!.setClientRole(role: ClientRoleType.clientRoleBroadcaster);
      await engine!.enableVideo(); // ➐ 동영상 기능을 활성화합니다.
      await engine!.startPreview(); // 핸드폰 카메라를 이용해 동영상을 화면에 실행합니다.
      // 채널에 들어가기
      await engine!.joinChannel(
        // ➑ 채널 입장하기
        token: TEMP_TOKEN,
        channelId: CHANNEL_NAME,
        // 영상과 관련된 여러가지 세팅을 할 수 있습니다.
        // 현재 프로젝트에선 불필요합니다.
        options: ChannelMediaOptions(),
        uid: 0,
      );
    }

    return true;
  }

  @override
  Widget build(BuildContext context) {
    return Scaffold(
      appBar: AppBar(
        title: Text('LIVE'),
      ),
      body: FutureBuilder(
        // ➊ Future값을 기반으로 위젯 렌더링
        future: init(),
        builder: (BuildContext context, AsyncSnapshot snapshot) {
          if (snapshot.hasError) {
            // ➋ Future 실행 후 에러가 이씅ㄹ때
            return Center(
              child: Text(
                snapshot.error.toString(),
              ),
            );
          }

          if (!snapshot.hasData) {
            // ➌ Future 실행 후 아직 데이터가 없을 때 (로딩 중)
            return Center(
              child: CircularProgressIndicator(),
            );
          }

          return Column(
            crossAxisAlignment: CrossAxisAlignment.stretch,
            children: [
              Expanded(
                child: Stack(
                  children: [
                    renderMainView(), // 상대방이 찍는 화면
                    Align(
                      // 내가 찍는 화면
                      alignment: Alignment.topLeft, // 왼쪽 위에 위치
                      child: Container(
                        color: Colors.grey,
                        height: 160,
                        width: 120,
                        child: renderSubView(),
                      ),
                    ),
                  ],
                ),
              ),
              Padding(
                padding: EdgeInsets.symmetric(horizontal: 8.0),
                child: ElevatedButton(
                  // 뒤로가기 기능 및 채널 퇴장 기능
                  onPressed: () async {
                    if (engine != null) {
                      await engine!.leaveChannel();
                    }

                    Navigator.of(context).pop();
                  },
                  child: Text('채널 나가기'),
                ),
              ),
            ],
          );
        },
      ),
    );
  }

  Widget renderSubView() {
    if (uid != null) {
      // AgoraVideoView 위젯을 사용하면
      // 동영상을 화면에 보여주는 위젯을 구현할 수 있습니다.
      return AgoraVideoView(
        // VideoViewController를 매개변수로 입력해주면
        // 해당 컨트롤러가 제공해주는 동영상 정보를
        // AgoraVideoView 위젯을 통해 보여줄 수 있습니다.
        controller: VideoViewController(
          rtcEngine: engine!,

          // VideoCanvas에 0을 입력해서 내 영상을 보여줍니다.
          canvas: const VideoCanvas(uid: 0),
        ),
      );
    } else {
      // 아직 내가 채널에 접속하지 않았다면
      // 로딩 화면을 보여줍니다.
      return CircularProgressIndicator();
    }
  }

  Widget renderMainView() {
    if (otherUid != null) {
      return AgoraVideoView(
        // VideoViewController.remote 생성자를 이용하면
        // 상대방의 동영상을 AgoraVideoView 그려낼 수 있습니다.
        controller: VideoViewController.remote(
          rtcEngine: engine!,

          // uid에 상대방 ID를 입력해줍니다.
          canvas: VideoCanvas(uid: otherUid),
          connection: const RtcConnection(channelId: CHANNEL_NAME),
        ),
      );
    } else {
      // 상대가 아직 채널에 들어오지 않았다면
      // 대기 메시지를 보여줍니다.
      return Center(
        child: const Text(
          '다른 사용자가 입장할 때까지 대기해주세요.',
          textAlign: TextAlign.center,
        ),
      );
    }
  }
}
- home_screen.dart
import 'package:flutter/material.dart';
import 'package:video_call/screen/cam_screen.dart';

class HomeScreen extends StatelessWidget {
  const HomeScreen({Key? key}) : super(key: key);

  @override
  Widget build(BuildContext context) {
    return Scaffold(
      backgroundColor: Colors.blue[100]!,
      body: SafeArea(
        child: Padding(
          padding: const EdgeInsets.all(8.0),
          child: Column(
            children: [
              Expanded(child: _Logo()),  // ➊ 로고
              Expanded(child: _Image()),  // ➋ 중앙 이미지
              Expanded(child: _EntryButton()),  // ➌ 화상 통화 시작 버튼
            ],
          ),
        ),
      ),
    );
  }
}

class _Logo extends StatelessWidget {
  const _Logo({Key? key}) : super(key: key);

  @override
  Widget build(BuildContext context) {
    return Center(
      child: Container(
        decoration: BoxDecoration(
          color: Colors.blue,
          borderRadius: BorderRadius.circular(16.0), // 모서리 둥글게 만들기
          boxShadow: [  // ➊ 섀도우 추가
            BoxShadow(
              color: Colors.blue[300]!,
              blurRadius: 12.0,
              spreadRadius: 2.0,
            ),
          ],
        ),
        child: Padding(
          padding: EdgeInsets.all(16.0),
          child: Row(
            mainAxisSize: MainAxisSize.min,  // 주축 최소 크기
            children: [
              Icon(  // 캠코더 아이콘
                Icons.videocam,
                color: Colors.white,
                size: 40.0,
              ),
              SizedBox(width: 12.0),
              Text(  // 앱 이름
                'LIVE',
                style: TextStyle(
                  color: Colors.white,
                  fontSize: 30.0,
                  letterSpacing: 4.0,  // 글자간 간격
                ),
              ),
            ],
          ),
        ),
      ),
    );
  }
}

class _Image extends StatelessWidget {
  const _Image({Key? key}) : super(key: key);

  @override
  Widget build(BuildContext context) {
    return Center(
      child: Image.asset(
        'asset/img/home_img.png',
      ),
    );
  }
}

class _EntryButton extends StatelessWidget {
  const _EntryButton({Key? key}) : super(key: key);

  @override
  Widget build(BuildContext context) {
    return Column(
      mainAxisAlignment: MainAxisAlignment.end,
      crossAxisAlignment: CrossAxisAlignment.stretch,
      children: [
        ElevatedButton(
          onPressed: () {
            Navigator.of(context).push(  // ➊ 영상 통화 스크린으로 이동
              MaterialPageRoute(
                builder: (_) => CamScreen(),
              ),
            );
          },
          child: Text('입장하기'),
        ),
      ],
    );
  }
}
- agora.dart
const APP_ID = '앱ID를 입력해주세요!!!';
const CHANNEL_NAME = '채널 이름을 입력해주세요!!!';
const TEMP_TOKEN = '토큰값을 입력해주세요!!!';'EDOC > Flutter 스터디 (2025-1)' 카테고리의 다른 글
| [4.1~4.3] 일정 관리 앱 만들기 ~ 서버와 연동하기 (0) | 2025.06.27 |
|---|---|
| [3.7 ~ 3.9] 오늘도 출첵 ~ AI 채팅봇, 소울챗 (1) | 2025.05.21 |
| [3.1 ~ 3.3] 블로그 웹 앱 콜백 함수, 웹뷰, 네이티브 설정 ~ 만난 지 며칠 U&I 상태 관리, CupertinoDatePicker, Dialog, DateTime (0) | 2025.05.20 |
| [2.6 ~ 2.7] 기본 위젯 알아보기 ~ 앱을 만들려면 알아야 하는 그 밖의 지식 (0) | 2025.04.12 |
| [1.4 ~ 2.5] 다트 3.0 신규 문법 / 플러터 입문하기 (0) | 2025.04.05 |